
Welcome! We’re so glad you’re here to begin embracing your crafty side with embroidery.
In this beginner’s guide, we’ll walk you through the essentials of embroidery, from selecting the right materials to mastering basic stitches. Embroidery is a hands-on fiber craft that allows you to create appealing designs with needle and thread.
Let’s dive in and unlock the joy of this comfort craft perfect for all generations.
Gather Your Materials
To start, you’ll need a few essential materials.
::> Fabric.
Choose a fabric that suits your project. Beginners often find it easier to work with plain, medium-weight fabrics like cotton or linen. Stitched Stories kits and fabric patterns are printed onto 100% plain weave cotton.
::> Pattern.
Choose a pattern with imagery that appeals to you and that has stitches you can easily master from simple diagrams.
You can transfer a pattern to fabric yourself using a lightbox and an embroidery transfer pen. We have a free starter pattern and transfer how-tos for you here: Free Mini Pattern
The easiest way to get started is with a pattern that’s already printed to the fabric. Stitched Stories patterns are printed in color to cotton fabric so that you are immediately ready to start stitching.

::> Embroidery Hoop.
An embroidery hoop helps keep your fabric taut and makes stitching more manageable. All Stitched Stories kits come with a simple bamboo hoop that can also be used to frame your piece at the end.
::> Embroidery Needles.
Embroidery needles have a sharp point and longer eye to ease threading multiple strands of floss. Our designs are typically stitched with 2 or 3 strands of floss. The size 5 John James brand needles included with our kits are ideal for this work. If you’re stitching with more strands, use a size 3 needle. (The lower number has a larger needle eye.)
If you want to try a variety of needle sizes, we include a 16-pack of DMC brand needles sized 3 to 9 in our Stitcher’s Tins (along with scissors, wax floss conditioner, and a needle minder).

::> Embroidery Floss.
This is the colorful thread that brings your designs to life. DMC brand floss is a popular choice for its quality and wide range of colors, and it’s the floss we include in all of our kits.

::> Scissors:
You’ll also need a pair of small embroidery scissors for snipping threads.

Start with Basic Stitches
Mastering basic stitches isn’t difficult. They’ll give you the foundation for an ongoing practice of fiber crafting. Begin with these three stitches
Straight Stitch
- Bring needle and thread up through fabric at 1.
- Insert the needle back in at 2, and make a straight line.

Back Stitch.
- Bring needle and thread up through fabric at 1.
- Insert needle back into fabric a stitch-width to the right (2) and then come back up a stitch-width to the left (3) of the thread.
(NOTE: You’ll start at the RIGHT end of line to be stitched.)

Satin Stitch
- Bring needle and thread up at edge of shape you’re filling (1).
- Insert at the other side of shape (2).
- Come back up a little below 1 (3).

For a closer look at these first stitches and a couple more, see our blog post: 5 First Embroidery Stitches for Beginners to Learn

Be sure to see our blog post that shows 12 classic stitches we love and when and how to use them on embroidered projects: 12 Classic Hand Embroidery Stitches

Learn Embroidery With a Beginner Kit Or Our Free Sampler
The easiest way to get started is with one of our Beginner Embroidery Kits. Click here to see all of them and find a design that you love. With our kits, the pattern is already transferred to fabric, it’s in color, and you’ll be working with first foundational stitches. You’ll get a 4-page stitching guide that walks you through embroidering your first project.

Here’s what Lee said about learning embroidery with Patchwork:
A great method to learn embroidery. All the things you need to get started in one place. Great instructions and quality products. Love the needle holders. Will be purchasing more kits
Vikie, another beginning stitcher said of our kits:
I’m amazed at how simple and easy this is, especially for a beginner. Everything I could ever need came in this package. I’m so excited to finish it and order another one!
You can use our free Mini Sampler pattern and how-tos to get started. Click here for that resource.
Practice, Practice, Practice
Your embroidery skills will improve with practice. Start with simple designs and gradually challenge yourself with more intricate patterns. Don’t be discouraged by mistakes; they are part of the learning process. Embrace the journey and enjoy the meditative nature of stitching.
Our blog post How to Establish a Regular Practice of Embroidery gives you a route to incorporating embroidery into your daily life.

Personalize Your Projects
Inject your unique style into your embroidery projects. Experiment with different colors, thread combinations, and design elements. Embroidery allows you to infuse your creations with personality and create one-of-a-kind pieces.
We’ve got several “Stick and Stitch” motifs patterns that you can adhere to items like your jeans or a tea-towel or t-shirt. This is a way to start making embroidery a part of your look.
Engage with our Embroidery Community
Having a community of fellow stitchers is a wonderful way to learn, find inspiration, and share your progress. Follow us on Instagram, Facebook, and Youtube. Tag us when you share you work so that we can include it in our stories–and keep an eye on our stories for the other projects we’re sharing.
Embrace Your Crafty Side with Embroidery
Are you ready to embrace a mindful and satisfying comfort craft perfect for all generations?
Stitched Stories embroidery kits give you everything you need to create a finished piece of hoop art. New stitchers use our illustrated project guides to master a dozen classic hand embroidery stitches. Experienced needle crafters enjoy working a range of stitches and being able to choose from a wide variety of themed projects. Patterns are designed to give you an absorbing embroidery project.
Remember, the key is to start small, practice regularly, and enjoy the process. Happy stitching.
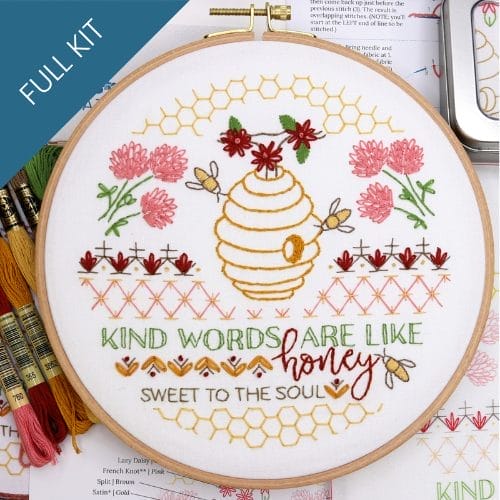
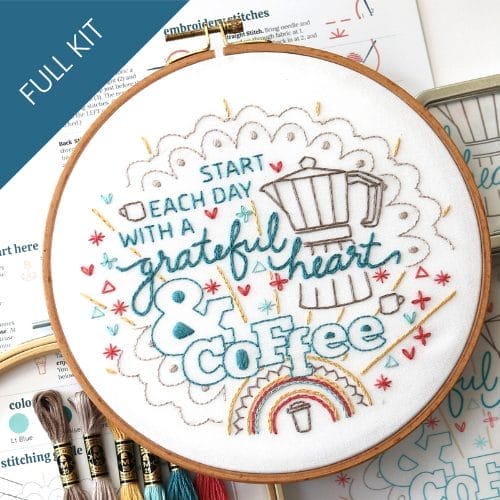
Embroidery that celebrates homey comforts...
Morning coffee, kind words, or slow napping afternoons, take your pick. These best-selling favorites are perfect for a kitchen nook, a thoughtful gift, and cozy handmade touches.