If you’re new to embroidery–or looking for a path to master essential first stitches–here are 5 beginning stitches to master.
(Diagrams for each are included in all of our kits and patterns AND on this downloadable guide.)

1. Straight Stitch.
Start here.
Learn the simplest and most foundational stitch–the STRAIGHT stitch–on Patchwork.
- Start with the red and yellow stars made with three criss-crossing straight stitches.
- Move on to yellow hexagons nested inside orange hexagons to make a honeycomb pattern.


More practice.
Mountain Time gives you lots more practice with the straight stitch:
- the light green hills are filled with a repeating burst pattern.
- the tent has diagonally running motifs made with criss-crossed plus signs and short diagonal stitches

Step it up.
The blossoms on Jacobean are filled with layered straight stitches, each layer a different color. In the blue blossom:
- start with a grid of horizontal and vertical lines in light blue
- layer darker blue diagonal lines over top
- finish with very short light blue lines to anchor at spots where the diagonals cross

2. Back Stitch
Start here.
The back stitch is the simplest way to render lines. On Patchwork, you’ll use it:
- for the long dark orange diagonals framing yellow bursts, and
- for the blue nested curves


More practice with a variation.
Get a two-tone line when you “whip” a back stitch. See it here on the greenhouse in Rolling Hills. Notice how the outer “framing” lines are a bit darker. Each light blue back stitch has been wrapped with a darker blue thread. This is a “whipped back stitch.”

Step it up with layered grids.
The fill on the tent in Play is done with two back-stitched grids: one in pink and one in yellow.
Each long line in the grid is done with the back stitch. First stitch all of the pink lines going one way. Then stitch all of the pink lines going the other way.
And THEN stitch all of the yellow lines–first one way and then the other. This is a really relaxing back stitch application because you never have to think about keeping the stitch length regular: just go from one intersection to the next.

3. Satin Stitch
Start here.
The satin stitch is a series of straight stitches–all lined up and filling an area–as in the small circles on Patchwork.


More practice.
School Days gives you lots of ways to practice the satin stitch in big and small areas:
- the continents on the globe are filled with light green satin stitching
- the beads on the abacus and the windows on the Viewmaster reel are smaller areas for satin stitching
- the banner pennants are rendered with diagonal satin stitching

4. Fly Stitch
Start here.
The fly stitch is a fun one and you’ll learn it in two spots on Patchwork:
- the dark navy stitches dividing blocks are done with nested fly stitches
- the grid at bottom left is rendered with rows of fly stitching–each row alternates direction


More practice.
Cuckoo Clock gives you lots of practice mastering the fly stitch:
- the tan lines in the eaves are large nested fly stitches
- the blue scallops running below the clock are done with loose fly stitches and a short anchor stitch
- the yellow hour markers on the clock are done with a tight fly stitch and a long anchor stitch

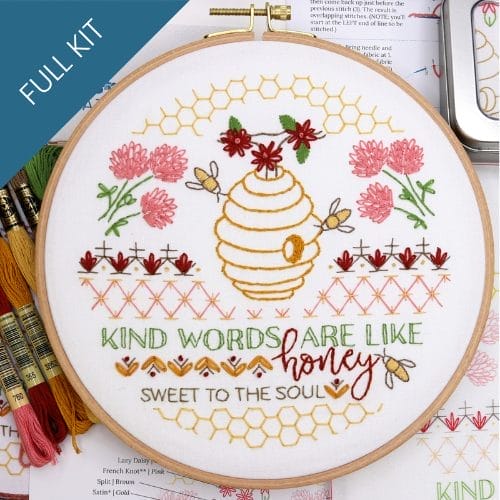
5. Lazy Daisy
Start here.
The loopy lazy daisy stitch adds nice curves to your embroidery. See it used on Patchwork to render the four-petaled blossoms.


More practice.
Tea Party is packed with lazy daisy stitches in a variety of motifs:
- there are the navy-blue medallions circling the doily-like outer edge
- see orange three-petaled lazy daisy blossoms nested in between large red lazy daisy stitches
- one of the teacups is filled with blue lazy-daisy blossoms
- the large orange flower on the teapot is a mass of lazy daisies.

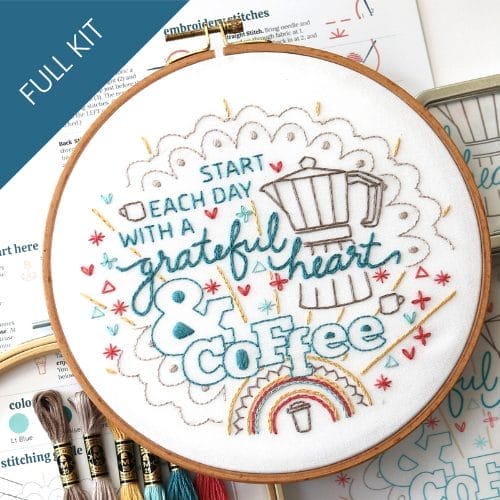
Step it up. (the chain stitch is a series of lazy daisy stitches)
Once you’ve mastered the lazy daisy stitch, the chain stitch is a breeze. That’s because the chain stitch is actually a line of lazy daisies!
Use it in several placees on Start with Coffee:
- for the scripty “grateful heart”
- for the nested semi-circles at the bottom of the design
- for the yellow rays bursting through the design like morning sun

Every Stitched Stories kit includes a detailed stitching guide with diagrams to the whole design and to these individual stitches I’ve just shown.
There are also detailed steps for a new stitcher and tips for stitch variations. I’ve got you covered every step of the way.

Are you ready to get started with a new embroidery project–and to keep improving your mastery of classic embroidery stitches?
Click here to choose your next project in the Stitched Stories shop.
Embroidery that celebrates homey comforts...
Morning coffee, kind words, or slow napping afternoons, take your pick. These best-selling favorites are perfect for a kitchen nook, a thoughtful gift, and cozy handmade touches.