Outlining shapes is often needed in embroidery.
Below are examples and how-tos for five stitches you can use for this work:
- Outline Stitch
- Back Stitch
- Split Stitch
- Whipped Back Stitch
- Chain Stitch

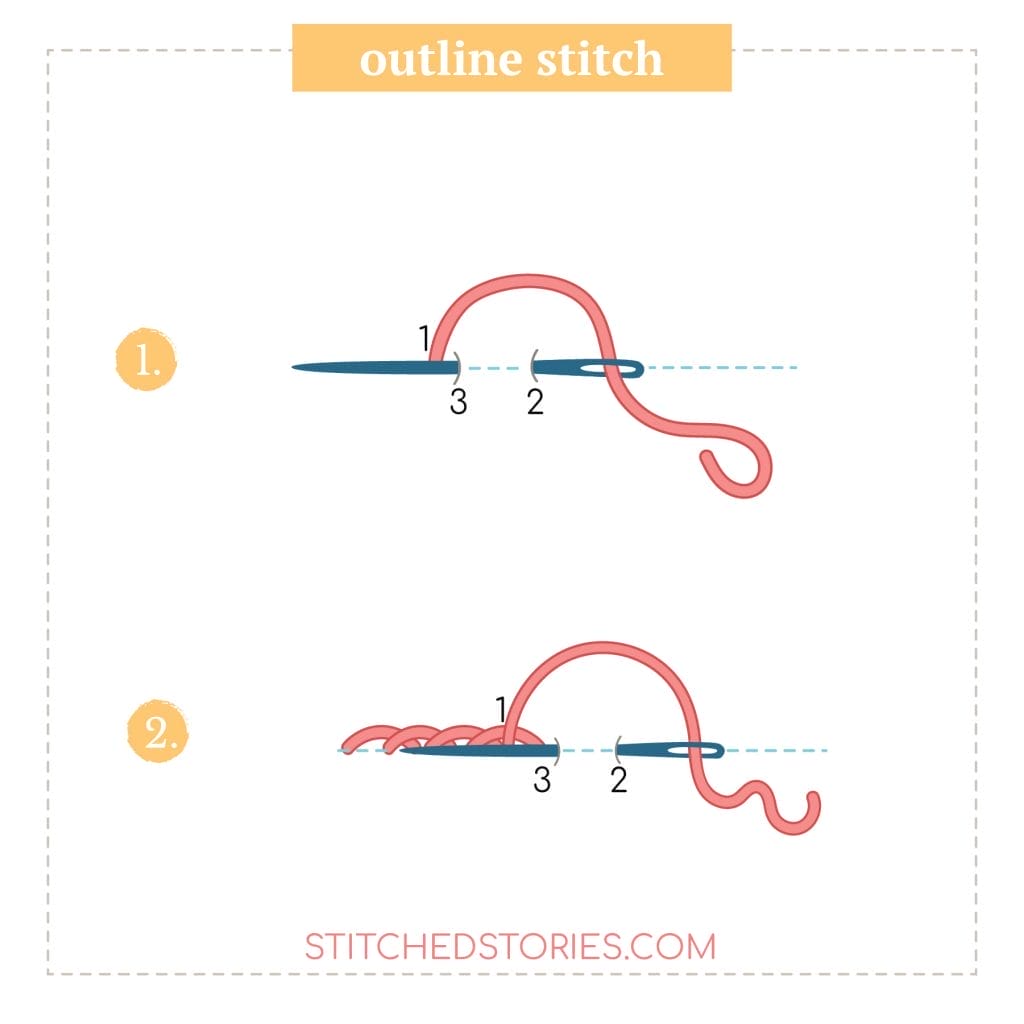
1. Outline Stitch
The OUTLINE STITCH is a go-to choice for much of your outlining work. With it you have a layered and rich stitch. As you go around curves, though, you’ll need to keep the stitches short–or choose one of the other stitches described below.
See the Outline Stitch here in Bessie’s Blossoms outlining the stems of the curving branches, Bessie, and the strap for her bell.

How to Embroider with the Outline Stitch.
Bring needle and thread up through fabric at 1. Insert needle back into fabric a stitch-width to the right (2) and then come back up just before the previous stitch (3). Tthe result is overlapping stitches. (NOTE: you’ll start at the LEFT end of line to be stitched.)
2. Back Stitch
With a shape outlined in the Back Stitch, you’ll see a distinct line of short stitches. It’s good for adding contrast and for framing smaller or curvier areas. Here on Lighthouse, it’s used to outline all of the waves. If we’d used the Outline Stitch with such curvy areas, we’d end up with less well-defined shapes–unless the stitches were quite small.

How to Embroider with the Back Stitch.
Bring needle and thread up through fabric at 1. Insert needle back into fabric a stitch-width to the right (2) and then come back up a stitch-width to the left (3) of the thread. (NOTE: You’ll start at the RIGHT end of line to be stitched.)

3. Split Stitch
Use the Split stitch with for short lines and/or curves where you’d like a more layered effect than the Back stitch gives . . .
. . . BUT where the Outline stitch would make things just a bit messy.
On Tea Party, we’ve used the split stitch on the handles of the tea cups. We want the outline to have depth and thickness–but precision. Thus, the Split stitch was a great choice.

How to Embroider with the Split Stitch.
Do this like the Back Stitch (described just above) EXCEPT, enter right through the middle of the previous stitch rather than to the left of it. This is great for tight detailed curvy lines.

4. Whipped Back Stitch
The Whipped Back stitch is a great choice for curvy lines that you want filled but without the visible breaks that Back stitch has. Take a look at the flower outlines on the van here in To The Woods. They are all rendered with the Whipped Back stitch. Take a look, also, at all the other outlining stitches used here. The body of the trailer is outlined twice with the Outline stitch: once in brown and once in blue. The door’s circle window as well as the tire are done with the Back stitch. The green swoops running across the trailer are done with a stitch I’m just about to describe: the Chain stitch.

How to Embroider with the Whipped Back Stitch.
Stitch the design completely with Back Stitch. Then pass needle under 1st stitch (1). Come back over that stitch (2), and then go under the next stitch (3). Do this again and again so that all of stitches are wrapped.

5. Chain Stitch
One last stitch that I like using for lines that need a little bit of oomph is the Chain stitch. See it here on Galaxy to define the pink halo on the planet in the bottom right corner of the design.

How to Embroider with the Chain Stitch.
Bring needle and thread up at 1. Insert at the same spot and up at 2. As you do this, loop working thread under the needle at 2. Pull thread all the way through to create a snug loop under the thread. Repeat by inserting needle at 2 and coming up a stitch ahead–again with the working thread looping under the needle.

You now have five stitches you can try out whenever you need to outline a shape with embroidery: the Outline stitch, the Back stitch, the Split stitch, the Whipped Back stitch, and the Chain stitch.
Stitched Stories embroidery kits are designed to have you using a mix of outline approaches so that you’re working with and mastering a variety of stitches — and so that you’re creating a great looking finished project. We always give you all the details on suggested stitches in the guide that comes with each kit.

